
Hi there!
Amazing — you’ve decided to start working with air-dry clay! Truly, one of the best decisions ever.
I started about a year ago, and I’ve been exactly where you are now. Probably feeling overwhelmed by all the information out there — everyone recommending different things, expensive supplies, and it’s hard to make sense of what you really need.
If that sounds familiar, you’re in the right place. I’m super excited to help you dive into this amazing craft.
Let’s get started — I’ll break everything down for you!
What do you actually need to get started?
Honestly, this part is important. When I first started, I was so overwhelmed by all the things people said I had to buy — just to try it out! It was kind of crazy.
So let me make it simple for you: here’s what you really need right now, just to see if you even like it. You can always buy more later if you get into it.
All you need to start is air-dry clay. That’s it!
Of course, if you want to paint or decorate your pieces later, you might need a few extra things — but for now, let’s keep it simple and focus just on the clay
What kind of air-dry clay?
Honestly, don’t overthink it. In my experience, most of the clays I’ve tried have worked just fine — it really comes down to personal preference.
If someone tells you to buy something super expensive, don’t stress — that’s not necessary. Most air-dry clays are in a similar price range, and they all work pretty well.
Here are the two I usually use and like — you really can’t go wrong with these:
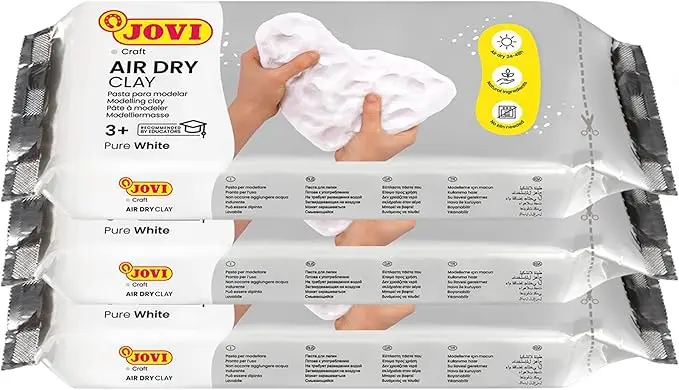
JOVI Air-Dry Clay
Honestly, this is my personal favorite. It’s super easy to work with — not too dry, not too wet. Once it dries, you can even fix small mistakes with a bit of water, which is such a lifesaver. Plus, it’s really budget-friendly.
Everything I’ve made with this clay turned out really nice and durable. You can buy a single pack [here], but it’s much more cost-effective to grab the three-pack [here]. You really can’t go wrong with it!
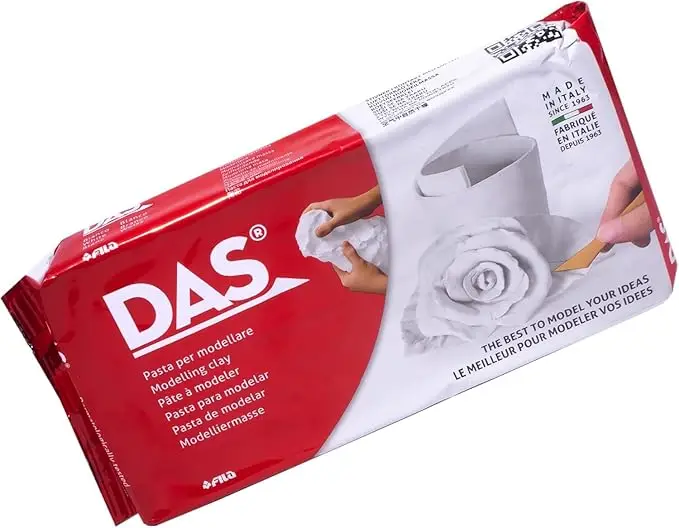
DAS Air-Dry Clay
This is another one I like and use — and it’s a pretty popular option. DAS also has a whole range of other creative supplies in their lineup.
It’s definitely a solid choice, but personally, I found it a bit too wet for my liking, which made it a little harder to work with. Still, the quality is great, and a lot of people swear by it. Maybe try both and see which one you prefer!
About Colors
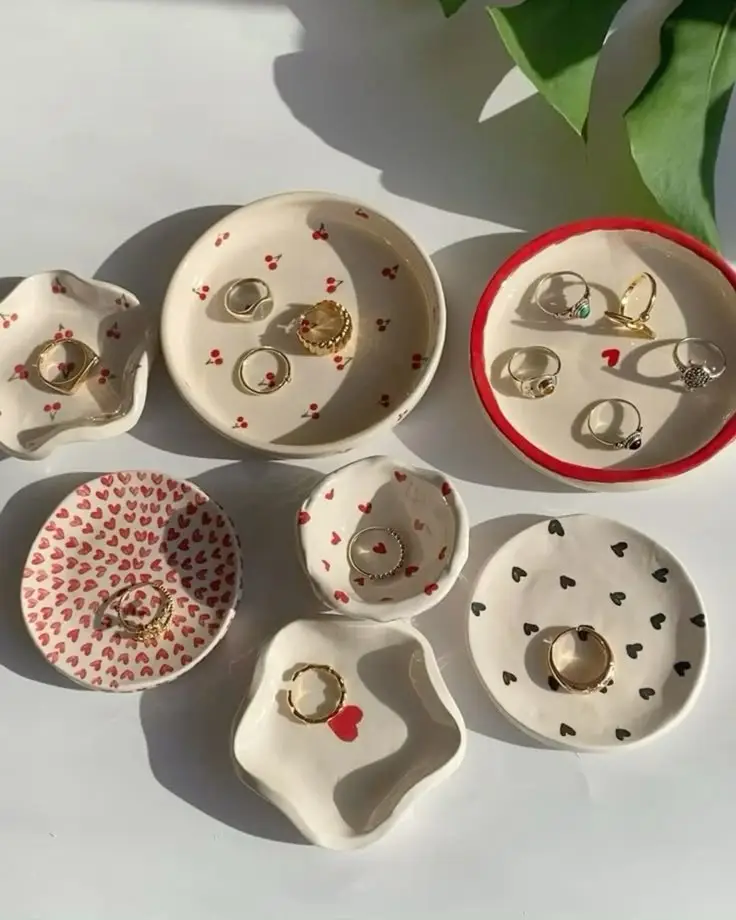
Color is totally up to you! I always go for the white clay so I can paint and customize it exactly how I want later on.
Okay, but what else?
I’m guessing you’re dreaming of making those super pretty, glossy, ceramic-looking pieces — and trust me, it’s not as hard as it looks! I actually have a whole post dedicated to how to use air-dry clay, but honestly, it’s quite simple.
Right now, I’d say don’t worry about buying extra tools for shaping the clay. You can totally get started using just basic things like a spoon or a knife — no fancy equipment needed!
Of course, tools can make things easier and more fun, so I’ll also show you what I’d recommend if you’ve already tried it, liked it, and feel ready to upgrade a bit.

Tools to Shape the Clay
There are a few small tools that can really help you achieve that smooth, polished finish. I’d recommend getting a tool set like [this one] — it’s usually much more budget-friendly than buying individual pieces. But of course, you can buy them separately too if you prefer. This one could also be good if you want a cheaper version with less tools in it.
These sets typically include a few shaping tools and a sponge to help smooth everything out. One thing to note: most kits don’t include a roller, so you might need to grab that separately.
In the beginning, I just used a regular kitchen rolling pin — the same one you’d use for gingerbread dough — and honestly, it worked great! But if you want cleaner, more consistent pieces later on, it might be worth investing in a proper clay roller like this.
And finally — this one’s underrated but seriously helpful — a mat to work on. I didn’t buy one for a long time; I just used baking paper. It worked fine in terms of preventing sticking, but it was so annoying because it kept slipping around. A proper mat will last a long time and make your life so much easier. Here is a good option.
Plus, when you get to the painting and glazing part later, it’ll save your table (and your nerves) from a lot of mess. Trust me on that one!
Let’s Talk About Painting Your Clay Creations!
Okay, now that you’ve got everything you need for shaping the clay, let’s dive into the fun part — painting! Once your piece is dry, I know you’ll want to bring it to life and make it look amazing.
Step 1: Prep Your Surface (Don’t Skip This!)
One super underrated step is sanding your piece after it’s dry. It helps get rid of the dust and creates a smoother surface for the paint to stick to. I didn’t do this at first, and my paint job looked rough and didn’t hold up well.
You don’t need anything fancy — just basic sandpaper will do the job. You can get it [here] or easily find some at your local hardware store. Pay attention tho, not to get a rough one, as that can destroy the surface of your clay.
Prime it!
Next up: primer. I know it might feel unnecessary, but it really helps. You’ll want to coat your clay with primer a couple of times before applying the actual paint. It makes the colors pop and stick better — and since you’ll need quite a bit of it, using primer is also more budget-friendly than using expensive white acrylic as your base.
There are lots of good primers out there (most will do the trick), but I personally use [this one], and it works perfectly for me. I usually stick with white primer so I can paint any color on top of it.
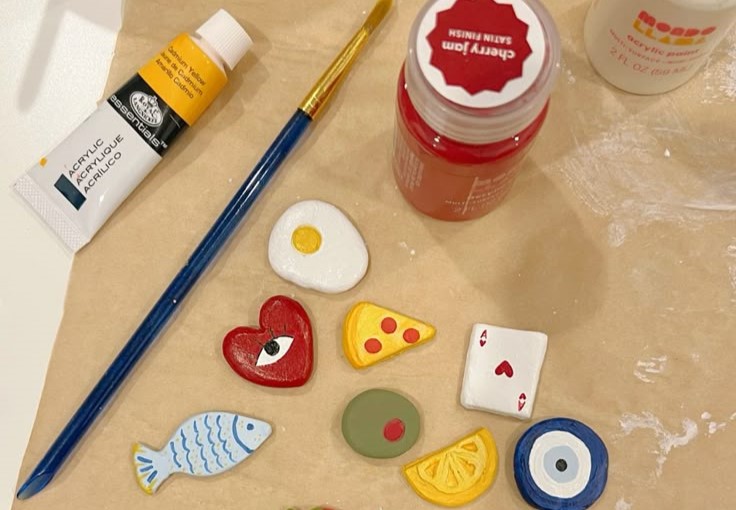
Step 3: Time to Paint!
You’ll need acrylic paint. Important: ACRYLIC, not oil! I accidentally used oil paint once and it never dried… total disaster.
Also — don’t buy expensive paint! You don’t need it. Fancy acrylics are made for canvas painting, not for clay. Basic, affordable acrylic paints work just as well here.
I recommend buying a set — it’s usually cheaper. I also like to buy a big bottle of white and smaller packs of colors. Then I mix them to create custom shades. It saves paint, and the colors are usually super vivid anyway, so mixing with white works great.
Here’s a great cheap small acrylic set that comes with brushes too: [link]
A good set with larger paint tubes that will last longer: [link]
An even bigger one in case you just want to buy it now and not deal with it later: [link]
And here’s the big bottle of white I use: [link]
Step 4: Glaze It!
Once you’ve painted your piece, you’ll want to finish it off with a glaze. I prefer a glossy glaze that gives it that ceramic-like shine. I’ve found that the thicker glazes tend to dry nicer and look better than the more watery ones.
Here’s the one I use and love: [link]
I recommend buying quite a lot from this if you decide to keep this hobby, cause you will need it:)
And Finally… Brushes!
You can totally start with whatever brushes you have lying around, but honestly? I hated using my old watercolor brushes — they just didn’t do the job well. Investing in one or two good brushes made a huge difference for me. It’ll make painting easier and your finish smoother.
Here’s a super cheap brush set I recommend: [link]
You’re all set!
Wishing you the best of luck — have so much fun with this! Don’t be afraid to mess up. Try, try again, and most importantly: enjoy the process of creating.
But hey, if you’d like to fail a little less, I’ve put together a post with some tips and tricks I learned the hard way 😄 You can check it out [here].
And now, here’s a quick summary of all the products (with links) you’ll need to get started:
Thank you so much for such a detailed and fun explanation.
You have some great tips and I have placed my order with a well known online shop.
I am looking forward to starting, thank you again!